
A standard single-pole light button is the kind where you flip the button's toggle or paddle up or to transform lights on and off. This acquainted button remains in fact described by hardware suppliers as well as likewise electricians as a "single-pole light button."
A single-pole button has 2 brass incurable screws on the side that attach to the electric circuit's black (" hot") cords. One black cord stems from the source of power (the electrical panel) as well as the different other goes to several lights.
When the button in on, power flows via it from the incoming wire to the outward bound cord. When you change the turn off, it interferes with the circulation of electric energy. Consider it like a drawbridge that cars and trucks as well as vehicles can go across when it remains in placement yet, when open, interrupts the flow of vehicles. Many buttons similarly have a green grounding screw that connects to the circuit's bare ground cable for safe "grounding" of the switch.
How to Wire a Dimmer Switch Over
A dimmer button is wired similarly as a standard single-pole switch, however the dimmer generally has it's very own cable televisions presently connected to the switch-- so you utilize cable nuts rather than screw terminals. In this illustration, you can see the red-colored "hot lead" cables of the dimmer are connected to the inbound black cable from the electric resource (the electrical panel) as well as the black cable that goes to the light's black cord which, in this circumstance, is a white cord that has been taped with black electrical tape to indicate that it functions as a black cable.
Electrical Wiring a One Way Switch Over
A one technique light button has 2 terminals which is an typical significant as COM or C. The typical is for the live wire that provides the input voltage to the switch. The various other incurable is kept in mind as L1 as well as also is the end result to the light.
When you're circuitry decorative light switches such as chrome or stainless-steel and so on, you'll locate that the switch will additionally have an L2 terminal which indicates it's a two method button. If you're circuit is just one method, you can neglect this incurable along with it will still work. This results from the reality that 2 way buttons can likewise be made use of on one method circuits. Suppliers don't make decorative one method switches.
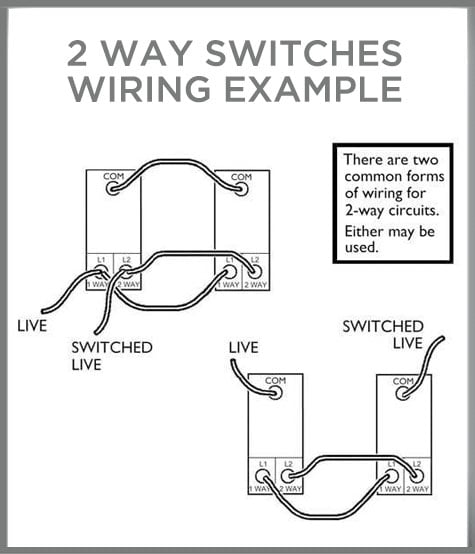
Electrical Wiring a 2 Means Switch
The a lot more recommended light switch with two technique altering, which indicates you can alter the very same lighting fixture from 2 switches that are located in various sides of a area. 2 means buttons have a COM terminal in addition to L1 and also L2 terminals.
When L1 is off L2 would hop on.
When L1 is on L2 would be off.
There are 2 circuitry alternatives for this:
2 technique button wiring instances
Advanced dimmer buttons like Varilight Eclique (currently called V-Pro Multi-Point Touch) and additionally Lightwave have an S incurable rather. The S terminal can just be connected to a matching servant and also will not deal with a typical 2 means switch. Right here is a wiring circumstances of a Lightwave RF Gen1 dimmer button shown from behind:
Intermediate Switch Over Electrical Wiring
Intermediate switching is similar to 2 methods however allows a third switch to be incorporated. An circumstances of this would absolutely be having one switch at the end of a stairways, one on top as well as one in the facility. It's not known as 3 implies changing since you can furthermore include more buttons for 4 way switching or even more.
Intermediate switches have terminals considerable L1, L2, L3 as well as likewise L4. Take a look at the diagram below that demonstrates exactly how to implies a 3 indicates switch:
Intermediate button electric circuitry
2 Means Dimming
2 technique dimming allows you to lower a light from 2 places. You can't take advantage of ordinary rotating dimmer switches to do this given that you could potentially lower the light to 10% with one dimmer, then walk over to the various other dimmer along with effort to dim the light to below 0%. Or vice-versa you could be trying to brighten the light over 100%. This would certainly cause significant instability on the circuit, like the time when the ghost busters crossed the beams!
You can have a dimmer switch as well as likewise an on/off turn on the same. The dimmer will certainly do the dimming as well as both method button will certainly have the ability to switch it on and off. If you have really reduced the lights to 50% the button will certainly maintain changing it and additionally off at that level till you lower it again.
Up till fairly recently 2 ways dimming was rather costly, possibly done using Lutron Rania up until they acquired discontinued. With the arrival of Varilight V-Pro multi-point dimmers (officially Eclique) as well as Lightwave Smart switches over, this is now simple in addition to doesn't set you back excessive. Varilight calls for a combination of master and also slave dimmers for it to function. While the Lightwave Smart collection dimmers can be set via their Application to perform 2 technique or probably 3 means dimming.
Wireless Switches
Wireless switches generally call for an additional receiver for them to work. The receiver is positioned in the ceiling void close to the lights. It obtains an RF (Radio Frequency) signal from the switch to educate the receiver what to do. If you have actually presently obtained cable televisions ready you can still make use of a cordless button by finishing the wires. Trademark name like Rako along with Lutron have their own cordless systems. Lightwave stopped their Gen1, Link Series.
Wireless switches over taken advantage of to be battery powered, Ener-J have really taken this a action better with their kinetic buttons. Taking advantage of the energy generated from pushing the switch, which suffices to send out the signal to the receiver. The receiver after that switches over the lights as well as are readily available in dimmable or non dimmable variations, in addition to a Wi-Fi version for mobile phone control. They can either be screwed or stuck to a surface in addition to have actually IP65 rated variations which are suitable for toilets.
Mobile Phone Dimming
If you intend to manage your lights from a cellular phone, the most convenient as well as likewise most cost-effective method of doing this is with Lightwave. All you require is a master dimmer switch, the Lightwave RF Wi-Fi center along with the Application which is cost-free to download and mount. The brand-new Smart Collection reduces LEDs effortlessly as well as additionally offers timer and additionally scene setup features. You can furthermore control smart power sockets, home heating controls and also various other Lightwave attachments.
Lutron QS Keypad Electric Circuitry
Amongst the primary advantages of using a residence automation system over typical dimmer switches is that you can change those big clunky looking dual plate, 3 in addition to 4 gang dimmer switches with stylish looking keypads. Lutron keypads have up to 10 buttons along with dim up along with lower down. The switches can be configured to develop lighting scenes of your picking. Right here is an instance of an etched 5 switch Lutron SeeTouch keypad in satin nickel with black switches.
Lutron QS Seetouch
As soon as you have actually picked the feature of each scene you can acquire the buttons etched by completing a type as well as likewise sending back to Lutron, this is consisted of in the price of the keypad. You could either have something easy like Scene 1, Scene 2 and more or try something far more bold like 'All On', ' tv Enjoying', 'Event Time', ' Evaluating' and also 'Erroneous' like in my instance. A scene can be a combination of various lights circuits that are ready to different dimming degrees. ' television Watching' may dim your major LED downlights to 10%, your wall surface lights to 30%, your cove LED strip lights to 50% in addition to also alter a table light on, all at the touch of one switch.
If you're taking into consideration setting up a full house automation such as Lutron Grafik Eye QS or Energi Savr Node ( referred to as ESN), the matching keypads which are referred to as SeeTouch call for to be wired completely in a different way to any type of one of the common switches that we've reviewed. To start with they need a 24V DC supply which can be taken directly from the Grafik Eye or ESN. The keypads can similarly take care of electronic blinds which are also easily offered from Lutron.
Utilizing the suggested Lutron control cable which has 2 pairs of cords, one set is for power along with the other set is for signal. Added keypads in addition to various other components can then be linked from one to the various other taking advantage of the QS Link terminal. You can likewise attach a Grafik Eye QS to an Energi Savr Node as well as also have them both on the exact same system.
The Lutron Grafik Eye is currently stopped as it was too overpriced to remain on top of various other up in addition to coming brilliant illumination brand names.
Lighting Circuits-- Loop In, Loop Out
The favoured means of electrical wiring recessed downlights is taking advantage of the loophole in, technicality out technique. This is a kind of identical circuitry that has one wire ( generally twin and likewise planet 6242Y) including the real-time, neutral in addition to earth cords binding in and also later on out of leach light appropriate. This is an alternate to the conventional junction box system, it makes use of much less cable television as well as additionally is much faster to finish.
Many downlights have a loophole in, loophole out incurable block attached to them. As an example the Ansell iCage has the largest one which was particularly developed for this sort of wiring. A preferred feature for downlights is push-fit terminals which furthermore have loophole in, loophole out terminals. Some have them straight linked to the downlight in addition to some come with circuitry ports. The picture listed below programs the loop-in, loop-out wiring technique:
loop in, technicality out circuitry
When mounting downlights that don't have their very own connection system, several installers develop their actual own by using a Click Blood circulation Port. With this port you wire the smaller sized male adapter right into the downlight and additionally the equal women port right into your loophole in, loophole out circuit. Then you merely plug the downlight right into the circuit as well as also continue the process with the complying with ones.
Other downlights like the Aurora M Collection in addition to Click Ovia Nano are provided with their actual own electrical circuitry connectors. The male port is currently pre-wired into the downlight so fifty percent of the task is presently done for you. An fringe benefit of using Blood circulation Connectors is if the downlight fails you can detach it and also get it altered by yourself without having to get an electrical contractor back in to divide it and afterwards reconnect the replacement.
Illumination Circuits-- Collection Electric Wiring
Collection circuitry is mostly utilized with several LED lights that are powered from the precise very same LED driver. It is usually made use of with smaller sized LED downlights or with LED ground lights that are constant present. Among the most famous consistent current scores are 350ma or 700ma. This layout listed below demonstrate how it's done:
Series circuitry example
Although a lot of the LED downlights we give are constant present, they are each given with their very own LED automobile motorist with is either directly connected to them or trails behind them like an old made halogen as well as also reduced voltage transformer mix. If you're circuitry a keys supply into each LED car chauffeur separately it would certainly be classified as similar wiring as well as can be done utilizing the loophole in, technicality out approach. Parallel electrical circuitry is primarily utilized with constant voltage illumination products such as LED strip lights.
Wiring a Downlight
If you're updating an existing halogen downlight you'll most likely either have keys voltage GU10 or low voltage MR16 (GU5 .3) halogens. Decreased voltage halogens will certainly have a transformer; this will absolutely need to be detached as it will definitely no more be asked for. The only reason you would definitely need to preserve the transformer is if you wished to utilize MR16 LEDs that operate a/c, this is a much less prominent alternative as you need to see to it the existing transformer is compatible with the LEDs and additionally if you're lowering them, you'll require to ensure that the MR16 LED, transformer and likewise dimmer switch are all compatible. Great deals of installers select the GU10 or incorporated option as their are much less parts to take into consideration and it generally costs less.
Opening Eliminate Dimension
If you're altering existing downlights you'll desire your brand-new ones to have a comparable hole removed dimension or else you'll either need to make the holes bigger or make them smaller (yes I claimed smaller sized) which would certainly include re-plastering your ceiling and re-cutting the holes. Matching the hole measurements is always a vital choice in the choice treatment.
Unless specifically specified downlights are wired in parallel, downlights are only typically wired in collection when numerous lights are being powered from the exact same LED driver. Depending upon which sort of downlight you select, you may require to establish terms to earth them. Below are two instances that clarify exactly how to wire a downlight, one is for a GU10 fire ranked downlight along with one more explaining just exactly how to wire an incorporated LED downlight, each has it's own earthing stipulations:
Wiring a Fire Ranked Downlight-- Ansell iCage
The Ansell has in fact obtained a huge loophole in, technicality out incurable block that permits 2x 1.5 mm twin in addition to earth cables to wired right into one downlight and also right into the following one. The iCage is provided Look At This with both a GU10 and also a GU5 .3 reduced voltage light holder.
When made use of with the GU10 light owner, the downlight is secrets voltage and additionally should be earthed. This is recognized as a Course I product. If you're making use of the low voltage GU5 .3 lamp owner the downlight is identified as Course III and additionally does not need a planet.
Wiring an Integrated LED Downlight - Halers H2 Pro
Some bundled LED downlights like the market leading Halers H2 Pro from Collingwood Lights are SELV which represents Security and also safety and security Bonus Low Voltage. This suggests that the voltage of the LED driver is listed here 12V a/c or as much as 30V DC. Voltages listed below 20V can't typically be felt by the human body as well as likewise are taken into consideration risk-free.
SELV light installments don't ask for an earth; they are determined as Course III created products. The LED chauffeur for the H2 Pro is in addition double protected which suggests it has 2 layers of insulation around the online parts, this additionally shows it does not need to be earthed. The DC outcome voltage is split from the a/c supply voltage.
The H2 Pro has a real-time in addition to neutral cord coming off the LED motorist, you'll need extra junction or adapter obstructs to wire them. By adding a Click Flow adapter you can produce your extremely own technicality in, loophole out system as explained in the previous loophole in, loophole out electric circuitry section.
How to Turn Off Your Home’s Electricity
Briefly:
To shut off the electrical power to your entire house, locate the main electrical panel (it pays to know where this is before you need it!) and flip the main circuit breakers at the top (usually a pair) to OFF.
To shut off the power to individual rooms or circuits, shut off the branch circuit breakers.
If you home is equipped with an older fuse box, pull the main disconnect or pull out the fuse block to shut off the power to the house. Unscrew (counterclockwise) individual fuses to shut off individual circuits
In Depth:
The main circuit breaker, usually located inside the main panel at the top, shuts off all of the electricity to the house. In a dire emergency, this is the one to turn off. Otherwise, shut off only the breaker that serves the problem circuit—that way, other parts of your house will continue to have lights and power. The main circuit breaker does not shut off the wires that run from the main panel breakers to the electric meter—these are always hot (electrically charged).
When you open the main panel’s cover, be sure there are no exposed electrical wires except for an exposed (non-insulated) solid copper ground wire. A protective panel should conceal all wiring—only the breakers or fuses should be exposed.
If this is not the case, call an electrician to have your electrical panel made safe. Never touch bare metal contacts inside a disconnect panel.
To shut off a circuit breaker, simply flip it to the off position.
To reset a circuit breaker, first turn it to off and then flip it to on.
To shut off a circuit protected by a pullout fuse block, grasp the block’s handle and pull it toward you. Once the block is out, you can remove the fuse from its mounting clips in the block—a special tool called a fuse puller makes this an easier job.
To shut off a circuit protected by a screw-in fuse, grasp the fuse’s glass rim and unscrew it (counterclockwise). A special pliers-like insulated fuse-pulling tool, available at home centers, makes this job safer.
Moreover, when put next to single or double pole switches, they are thicker and possess three screw terminals along with a grounding screw. 1 screw, which can be slightly darker than the rest, is a standard relationship and delivers electric powered present-day to among the list of switches that happen to be being operated.
Want to turn a lamp on using a light switch? In some cases it's handy to own an outlet managed by a switch. Bit by bit Recommendations regarding how to wire a switched outlet
While using the energy coming to your switch and afterwards going to the lights, you can recognize there are two black wires, two white wires and two floor wires (bare wires).
Unscrew the switch plate, pull it in the direction of you slowly and gradually and study the quantity of wires are existing and what colour They are really. (Idea: the plate might be connected to up to a few wires.
The white wires in this situation are only related alongside one another and never ever touch the switches. The black wire will probably be connected to the black screw about the switch
The white or neutral wire bypasses the switch and goes straight for your lights. This wire is needed to accomplish the circuit.
As soon as your loops are made, connect on the list of loops into the Make contact with point in your light switch. Hook the loop around the Speak to issue and tighten the screw in a very clockwise fashion.
If there have been no more electric power, along with the circuit was broken after the switch was flipped off, it would not manage to retail outlet information and facts like WiFi logins, household safety Tastes, and various options. This suggests you wouldn’t be able to combine your light switches along with your alarm system or clever speakers.Â
The capability will be measured in watts. Add up the wattage in the bulbs in all the fixtures the switch controls to be certain it falls inside the switch ranking detailed over the bundle or Guidelines.
But the capture is that, unlike a standard switch, Many of these new switches require a neutral to operate properly. This really is a dilemma if your aged switch is wired being a “switch loop,†this sort of that only a hot and also a switched very hot are available in the box.
†The copper wire is hooked up utilizing a eco-friendly screw; In case you have an older residence, you may not Have got a copper wire. Detach the 3 wires using a screwdriver and discard your aged switch (Impression 2).
In addition it comes along with an ambient light sensor, meaning it is going to self-alter the brightness if there’s daylight or sunlight while in the area, eventually saving you money. The dimmer switch even works with a variety of bulb sorts.
There isn't any way we could anticipate each and every problem and we do our greatest to tell of any challenges for each task. You'll want to Test community developing codes for appropriate set up and permits.Â
Besides, these may possibly appear just like single toggle variations, or they may search greater and broader. These have the similar on/off markings on their overall body, letting anyone who is using these switches for The 1st time learn about it.